Thursday, December 31, 2015

Meet The Blogger! Interview + Exciting News!

For this blog post, I have teamed up with my friend Lauren (aka @prepfromthemidwest) to bring you a “Meet the Blogger” interview/collab.  And YES, Lauren and I are making frequent blog collab’s a thing. I have wanted to do this for so long, and now I see that I have taken absolutely no negatives away from this experience, so don’t think this is the last time you’ll see her! Without further a do, let’s jump right on in!

1.  Hi Lauren! I am so excited to have you and welcome to my blog! Tell us a little bit about yourself!


I'm very excited to be here, thank you! I'm a Midwestern girl born and raised! I have one older brother, who goes to college down South! I'm a senior in high school & am going to college next year! I'm super excited to start somewhere fresh, as I'm going to college out of state! My family lives in the South, so that is how I discovered the preppy style! I'm a very determined and competitive person, but I use that to my advantage to help others! I absolutely love kids, and I'm a big people-person! I love talking to others! Some of my nicknames include "Smiley" and "Sunshine", and I think those explain my personality very well!

2. When did you decide to start your account, and why?

 I started my Instagram account in the summer this year, but I've had a blog on Tumblr for over 5 years! I love writing and taking photos, so blogging just seemed like the perfect thing to do! I absolutely love blogging, and I've even decided to incorporate it into my career! I can't wait to see where this takes me in the future.

3.   Being a blogger means being a people person! It also requires a lot of dedication. What would you say your strengths are as a blogger?

Strengths I see in myself include working well with others, encouraging fellow bloggers, and being a hopeful and positive person! Staying positive is key! Not only in blogging, but in life as well. I am a super positive and bubbly person, which is something that a lot of successful bloggers are. It pays off to stay positive and believe in yourself! Also, never let others get you down!

4.  The best way to expand with others through social media is by talking to them! What would you say that you enjoy most about meeting new people?

I think the most amazing thing about talking to new people on social media is finding other girls across the nation that are doing the same thing as I am! I have met so many amazing people through my blog, including companies I work with!

5.  The New Year is around the corner. What are your goals for 2016-2017 with your blog/social media’s and what were your achievements in the past year?

My achievement by December was to reach 25k on my blog! Not only did I meet it, but I exceeded it! I can't believe how far I've come in such a short time. One of the biggest changes I made to my blog this year was to change my account name! I want to incorporate blogging into my career, so I thought my name should resemble myself more than it did before! I really like the name change, and my followers seemed to like it as well! As far as the new year, I see lots of improvements coming to my blog and Instagram account coming soon! 

6How do you usually explain to others that you have a “preppy” account?

Only a few close friends know of my account, so I'm not an expert at explaining it to people! I was really nervous telling my friends, but I felt so much better after I told them! I was nervous mainly because I thought they wouldn't understand why I do it. They were all really accepting! I want to keep my blog life & personal (school) life separate until I graduate, which is why I don't tell a lot of people!

7.  What is usually their reactions?

They were all very accepting, thankfully! I think they were mainly surprised by the amount of followers I had, because I told them once I had reached 10k.

8.  Do you have any local “preppy-brand” stores near you? If so, have you ever told the owner or people that work there that you are a preppy blogger?

No preppy stores near me, sorry! Disadvantages of living in the Midwest! 

9.   What were their reactions? If not available, put n/a.

N/A

10.  About how many close friends have you made since the beginning of owning your account?

I've made tons of friends since staring my account! Recently, I've been finding more and more genuine people who have blogs and preppy accounts as well! It's so refreshing when someone contacts me, because I love making new friends!

11.Thank you so much for coming and talking with us! It was really interesting talking to you from one blogger to another. We hope to do more with you in the future!

Of course, love! I really enjoyed talking to you as well! I can't wait to collaborate in the future!


It was so interesting to hear about how Lauren ended up with where she is today! She is such a sweet, genuine person! Stay tuned for some more blog collab’s and have a wonderful rest of the day!

You can find Lauren on...

Instagram: @prepfromthemidwest
Blog: prepfromthemidwest.weebly.com
Snapchat: @prepfromthemw

xx,

Hannah

Wednesday, December 23, 2015

Just a little history...

For some reason I recently wanted to know where the word "preppy" came from. I know it's "a thing", but what about it's history? After reading a bit, I'm sure you'll have learned some things you may have not already knew...

Here is the Wikipedia definition: "Preppy or prep (all abbreviations of the word preparatory) refer to a subculture in the United States associated with the old private Northeastern university-preparatory schools." If that confuses you (like most Wikipedia definitions do to me), here's the definition a little simpler. "The word 'Prep' or 'Preppy' refers to a smaller culture in the United States that is connected to older Northern schools or "prepatories"." It is said that characteristics of preps in the past, include a particular speech vocabulary, way of dressing, and certain manners (etiquette) that would be reflective of an upper-class life-style.

Believe it or not, the idea of "preps" are connected to some of  the first schools that encouraged proper literacy and manners. Some of these first "prepatories" were opened during times with the American Nation was going through many bad conflicts as a way to let younger children have a "proper" upbringing. So even though (i'm assuming) most of us do not think school is the "most fun" place on earth, we can be thankful for the fact that it encouraged our style of who we are today!

So after doing some research, I found that there actually wasn't a lot of information on the web that told us about the history of preps. It was surprising, but at the same time somewhat expected. What I did find though, surprised me! I hope you felt the same way and enjoyed learning a little fun fact of the day!

xx,
~ Hannah 

Sunday, November 8, 2015

What's so swell about S'well?

I had been wondering this ever since I spotted one this summer at a store near South Front, a Lilly Pulitzer signature store in New Bern, NC. So wait, what are you talking about? A S'well bottle. Now you may ask why I am writing about a water bottle, but I see that a lot of you preps do physical activity, carry bottles around, or just love to hear about new and up-rising items that you NEED to test out for yourself!


With their different qualities and unique looking designs I started to wonder, what's so special about this water bottle?  So I took it into my own hands and did some research...with such amazing reviews and it's outstanding impact on people's lives, I've decided to share it with you all. Here's some background info to help you understand just a little bit more on how the S'well bottle became so popular.

It was first "thought up" by Sarah Kauss in 2010 when she was on a hike and realized that she was drinking warm water from a water bottle. Her mission was to eliminate the waste of plastic bottles. In the U.S., an estimated 50 billion bottles are dumped in landfill sites yearly, and 200 billion globally. As quoted "At S'well, we understand it's important to be a part of the solution" and that is why they have teamed up with many charity's working to solve the consumption of unclean water in other countries around the world.

So far, so good. The bottle seemed to me like a well crafted "fashionable" way to carry water with a good cause. I quickly found out, however that it's not only about the looks. What mattered most was on the inside...

The bottle is made of double layered stainless steel to keep you cold beverage cold for 24 hours and your hot drinks hot for 12. Plus, you wont taste a metal taste in your beverage and it is toxin free! Thus making it light-weight yet durable. After watching many videos I found that it will NOT sweat (guarenteed).

Image result for monogrammed s'well bottle

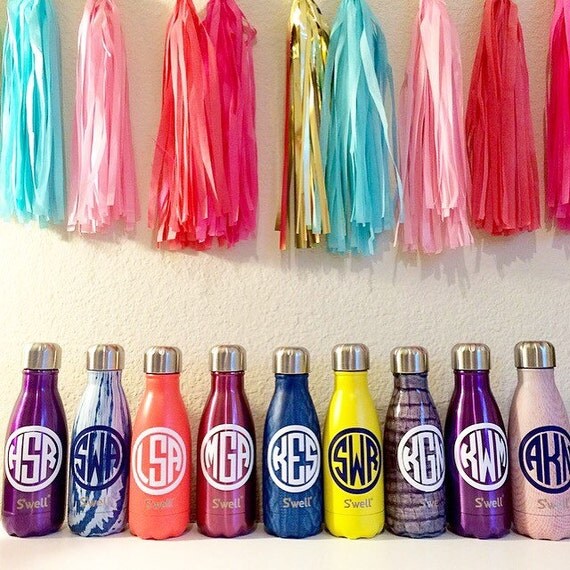
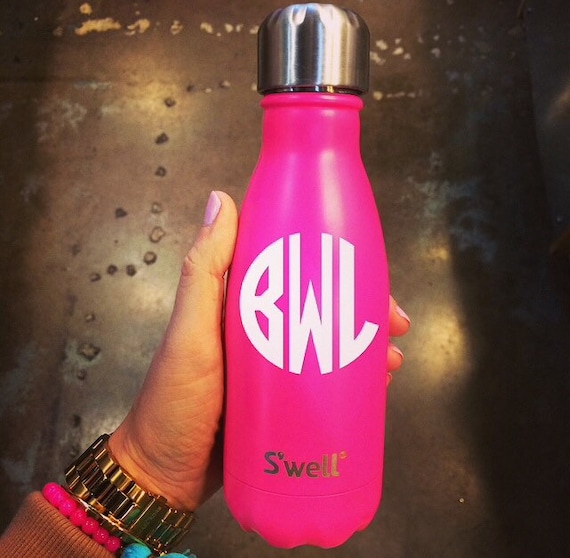
Also, the lids have a suctioned seal to them making it a mess free and yes, child proof bottle. It comes in MANY colors and designs such as marble, wood, hearts, etc. and the color DOES NOT chip off. Just to make it even better, monogram's can be put on bottles and here's what it looks like! (Sealed With A Paw is an adorable etsy shop known for her adorable S'well Bottle Monograms!-Shop linked down below!!)


They have a great grip to them and after seeing all these positives, I had to wonder..is it all true? YES!! I watched videos of people putting ice cubes in them and letting them sit in 95+ degree weather for hours and hours and the ice cubes were still there and freezing! Over all, I was extremely impressed with this company and the motives behind creating this handy bottle! Turns out, a lot of swell can come in a small package. :)

xx 'Scuse My Southern Prep

For more information, head over to the S'well Bottle Website or check out some S'well Bottle review videos here! If you're looking for some ADORABLE monograms for your S'well bottle, go to the Sealed With A Paw Etsy Shop! I would also like to mention that I was not asked to write this blog or sponsor by S'well, I just so happened to fall in LOVE with this product! 

Saturday, November 7, 2015

Fall Essentials

I know SO many people have already made a "fall essentials" blog post, but why can't I?! Here are some of the cutest fall trends I've seen on the rise recently...

Booties


Booties are already a hit. What's so great about them, is that there are so many different designs and pairs that they're unique, but still following the trend. Mine are from "Nine West" and are super comfy!

Vests


Vests were popular last year as well, but this year, designer's are getting a little fancy...this casual, dressy look is coming back with some fringe and fur added, letting everyone else know who's the boss in the room.

Plaid Blanket Scarfs


Last year I hosted a giveaway with a few other bloggers giving away a plaid blanket scarf. At first I didn't know how to feel about it because I didn't think they were very cute to be honest. But now with different ways to wear them, they're on an up-rise and coming back into style.

Dresses/Skirts and Scarfs


One thing I really notice every day is that people are really taking risks when trying to be prigional. Before this fall, I don't remember seeing people where either dresses or skirts paired with scarves, but this year I'm seeing a lot of it! It really is a cute was to add some fun to any outfit!

That's it for my main Fall Trends so  far, but if you see any new one's or have any ideas, let me know. xx all my Preps!

P.S. I would like to note that some of these images are from Google search engine and other websites.

Thursday, September 24, 2015

Preppy Shoe Care

Hey ya'll! So the other day, I was cleaning  out my closet and thought about how I need to "update" my shoes. So I bought some new shoes (yes I will post about them) but I also decided to clean my old ones. (Yes, I know this is a weird topic) All of the shoes I cleaned are listed below, and the step by step instructions of how I cleaned them! (The brands are in alphabetical order just to make things a little easier :))

Chaco's


Chaco's are, the bomb.com. Mine have lasted for 6 years, and they're the most comfortable shoe for hiking, camping, biking, and outdoors adventure basically. So here is my pair:


The straps you see are all one long strap (plus a smaller on for the heel) that complete a loop and form the shoe so that you can adjust the straps by sliding them in and out to make it fit your foot! The shoe itself does not get dirty, but due to this cool feature, the toe strap can be put down to transform into another style most commonly worn by men. I put mine down for about 2 years and when I tried to pull it back up, it was stuck! After doing a little research, I found out that many people fix this problem by doing these steps.

Step 1: Try to adjust the straps as much as you can, it's okay if they  don't budge!

Step 2: Pour one teaspoon of fabric softener into the opening of whichever straps aren't budging.


Step 3: Throw them into the washing machine with cold water, into a "mini" load


Step 4: When thee wash is done, your straps should budge and your soles should look just like new! There's no need to put them in the dryer!

Flats


No, this is not how to clean flats as that would vary depending on what they're made out of. This is really just a super weird way to fix getting blisters or just having tight areas!


Step 1: Blow dry one shoe at a time making sure you get the areas that put the most pressure on your foot. 

Step 2: Put a fluffy/thick sock on the foot of the shoe that you are blow drying, and put that shoe on your foot while it is still warm.

Step 3: Do the same to the opposite shoe, then put them on.

Step 4: Walk around in them till they're cooled

Step 5: Take off your socks and put your flats back on (comfy, right?!)

Is the back of your flat still rubbing you?

Apply a little bit of deodorant where the shoe is rubbing your heel. Now you're done!


Jack Rogers


So Jack Rogers is one of my favorite brands. Simply because of great quality! I have had mine for almost 3 years now and they're at their best! Jack Rogers don't get dirty, but because I'm very specific on details, I decided to spiffy them up just a bit! ***Note: I have always wanted the soles of mine darker to make nail polish colors pop, so the last step is how I did that, if you are only wanting to clean your soles, do not go on past the next to last step! Here's what you'll need:


All this is, is some saddle soap (leather soap). When I first heard that I'd be needing this, I got a little worried. How was I going to find saddle soap??? Turns out it's inexpensive, and one of my friends has horses, so she chopped off a little piece for me. I go to town with this step, so as you can see, this little smidget has lasted me a while. Then, you'll need a wash cloth, and a couple tooth picks.

Here's a picture of my Jack Rogers before just so you can compare them. My main focus was to get the dirt build out from the small hold designs, out from there the heel platform starts next to the arch, and to darken the sole as well as seal the cracks.


Step 1: Detailing

Simply use your toothpick to get the dirt build up out of the details, and creases. This will take a couple toothpicks, and don't be worried about pressing too hard! It takes A LOT to get the heel detailing to come off.


Here's what my Jack's looked like after! Clean, just the way I like it :)


Step 2: Soaping Up

This is a step that is a necessity when it comes to cleaning all leather. On the left, you will see the before, and on the right, you will see the during. Don't worry!!! After this process your Jack's will NOT be all brown, they will turn back to the regular color after drying and have a thin layer of sealant over them.

For this step, simply dampen your washcloth, rub it on the bar (or can) of soap, and apply it to the tom side of the sole, rubbing in circular motions until all is rubbed in.


Step 3: **This step is optional. it will help with cracking issues, and WILL darken your shoes, but only a tiny bit, not as much seen in this photo. This is the during image.** All you do for this, is take some olive or vegetable oil and put it on your washcloth, then apply it to your shoe and let it sit.

Then you're done! I hope this helped ya'll as much as it helped me!

Rainbow's Sandals

These are comfy, but the breaking in process can be a little confusing. To get them "warmed up" to your foot sooner, just soak them in water for about 2 minutes, then wear them around a bit! 

Sperry Topsider's 

These are pretty comfortable as well from the start, but one time my friend spilled ketch up on mine, and I wasn't too happy. How'd I get them to look like new?

One and only step: Dampen them!!

Here are my tips and tricks for the shoes I find to be most common in the "preppy world". If you have any other requests, let me know! Don't forget to check the social media in the right hand side-bar! Love my prepsters <3


Thursday, September 3, 2015

How to: organization during the school year

I am a Junior in high school and until this year, I didn't study, I wasn't organized, and school was just another thing to add to my "to do" list. But now, I'm trying my best to make all A's! I know it won't be easy, but staying organize will play a big role. So here's how I do it (and you can too)...

So my school has two different days, A and B days with four classes in each day. So for each day, I bring these Items:


I have the purple folder filled with notebook paper and the reason for this is that I really can't stand spiral notebooks. They don't fit evenly in book bags, tear up folders and papers when going in, and are bulky. Plus the messy paper edging you have to tear off if so much trouble! Folders are thin, easy to slide in and out, and you can tell which ones are which because you can see what's in them and the color from the top!

The yellow folder is my "A Day" folder. I fortunately was assigned two core classes in each day, so One pocket has my AP Lang "current" papers in it, and my Math "current" papers. By current papers, I mean anything that was due or is assigned for homework. It's really easy to organize like this because you know that all you have to do when you get into that class, is take out one folder.


This is my A-Day binder. I have two matching for both days. Yes...that is Lilly Pulitzer. Why? I love seeing personalized binder covers but downloading fonts and adding them to 8 different covers is just too much work. So I totally DIY'ed this project.

DIY Lilly Pulitzer Binder Cover

For this simple project, you only need:

~ Either:
    - A thick piece of paper
    - A piece of cardboard the size or paper
    - Or a regular piece or paper
~ Lilly Pulitzer tissue paper (or any other pattern of tissue paper- Lilly tissue paper can be found if you purchase a Lilly Pulitzer clothing item)
~ Glue
~ Flat surface to spread glue

Directions:

1. Take your piece of paper or cardboard and use it to measure out a piece of tissue paper (leave about an extra inch around the border)
2. Use your glue and spread a VERY thin layer on your main surface (the paper or cardboard)
3. Center your tissue paper and lay it on to the main surface gently. If you mess up and need to re-center it, be very careful to not tear the paper!
4. Cut four lines on each corner of the extra inch of tissue paper (cut from the corner point of extra paper and stop when you get to the corner of your main surface. **DO NOT cut main surface**)
5. Then apply glue to the extra edging and fold over to the back side.
6. Let dry, then you're done!

To organize all four classes into my 1/2 inch binder, I had to do a little planning but now I've got it down pact! 


Each of my classes has about 4 grading categories such as Major Assessments, Minor Assessments, CW, Exam, etc. I found these cool little 1/3 tab organizers at Target, 5 in a pack for 99 cents! What's even better?! The sticky labels come on a large piece of paper that you can put in your printer. You then go to that brand's design website and design your own patterns on your tabs! You won't see that here, though because I have yet to make them! I basically took the first 3 category's that I listed and made them into tabs. Then I made a miscellaneous tab and a study guide/notes tab. These tabs are the bomb.com though because they don't stick out the side and bend, leave room to see what's behind them, and come in adorable colors that just so happened to match my pattern of the year!!

After that, I took clear full sized pocket holders, labeled them with the classes names, and those keep my work safe!


Then, ya'll I am so proud of this, I have my Lilly Planner, notebook, and tervis! Okay seriously, the agenda is just flawless so ill have a section on that, but the notebook's paper has pink designs, and my tervis just tops it all of!! I have to say..I'm in love!!!


Here's my school print/agenda print of the year


And every pattern in school supplies has a different accessorizing pattern on the inside (as seen above) which just makes it even more perfect!!


So how do you organize all of this?! Pen's, my friend. I have all of the pens pictured and more, plus my highlighters and sharpies just to help me through the year. I don't know, everything's just more exciting when its in color :)


Lilly agenda's come with adorable stickers on the inside that cater to birthdays and special holidays to help you make your planner super fun which I think is a great idea. Whoever though of that? A genius, that's who.


I use the notes section of my agenda to write down tutoring days for my classes and passwords to anything I have to sign up for, through the school. I'll also probably use it throughout the year to put other important stuff in it, like college things. MMMMMM..funnnn.


(Psssst! This is my favorite month pattern!!) The beginning page of each month has a different pattern on it that is carried on throughout that month. I'm sure you've seen post about "what to do with old Lilly agenda's" so if you were confused on that, this is what they were talking about! I always see people use them for cool DIY's like cozies, whale stickers, desk decor, anything, and this print is probably my favorite of all of the months!

So above I was suppose to have my August, September, and November over-views of the month pictured, but the photo's havn't gone through yet! Since there are some adorable doodle's, I will probably post about them later. But, I like to put motivational quotes on random days just to give my days some random turns for the better! On Sunday's I like to put quotes or something having to do with god, and for holidays, I decorate that day with some funky doodle's! This is one of my favorite parts because I love personalizing my agenda.


This is an example of what my week's individual days look like. Ignore all of my personal notes, but I write down anything I need to do as soon as I'm assigned it. After I have COMPLETELY completed the task, I mark off the pink dot with a gold dot! Yes, I use a sharpie, and no, it does not bleed through!


Sometimes I don't understand in class material or I just want to write down my notes over and over to help me remember them so I use these notebooks for that. They're huge which is why I never carry them around, but they're good for taking notes on!

Pencil case?? Who uses that anymore?!?! Ummm me? Haha, yes I use a pencil case. It has three separate pockets and I am in love with the tastles!!! (Pictured lower down) Basically my two favorite C's: Convenient and Cute.


I always keep a little stack of sticky notes on my desk just to re write my to-do's as soon as I get home! A simple yet easy way to keep track!


This is my Lilly Pulitzer TI-84 calculator. Yet, another DIY...what can I say <3


Last but not least, on the average day, this is what my bookbag looks like...


My main big pocket, has my binder, notebook, agenda, and two folders equaling to about 2 inches of space being used.


My second biggest pocket has my calculator, pencil case, and yes, glasses case. (They make me look smart!! - But are also prescription because I'm just a smidge blind)


And my pencil pocket has my pens, highlighters, and white out thingy ma bob because my English teacher makes us write in ink and I always mess us. Shout-out to Ms. Rodney.

Every day I get home, I do my chores, transfer all of my to-do's from my agenda to my sticky note, and pick out my clothes for the next day. GIRLS!!! This is important you do not forget that last step! I use to not pick my clothes till the next day, and I'd always get to school late and ave rough mornings. Prepare your clothes the night before, you WILL NOT REGRET IT!!! Also pack your book bag for whatever it is you'll need for the next day.

Make sure that wherever you do your homework is a clear, organized, working environment! My tip to you is to turn your phone onto do not disturb for those homework hours as I know what getting distracted means..very well.

That's it for my how to stay organized during the school year! I told you the tricks I use, and now it's time for you to try them yourself! I will leave all of the item prices and purchase locations below! Ask me questions below in the comments about any ideas or any questions in general! 

5 Star 5 Subject Notebooks: Staples ($7.00)
Lilly Pulitzer Agenda: Pink Sorbet (Lilly Pulitzer- $34.00)
Lilly Pulitzer Notebook: Pink Sorbet (Lilly Pulitzer- $15.00)
Lilly Pulitzer Tervis Tumbler: Pink Sorbet (Lilly Pulitzer- $25.00)
Folders: Staples (50 cents)
White 1/2 inch Binder: Target ($2.00)
1/3 Tab Dividers: Target ($1.00)
Sleeve Covers: Target ($5.79)
Sharpie Pack of 3: Target ($3.99)
Gold Sharpie: Target ($1.59)
Pack of Colored Pens: Target ($4.99)
TI- 84 Calculator: Staples ($119.00)
Pencil Case: Target ($4.99)

Happy school year, ya'll!

xoxo,
     Hannah